Hitchhiker 

As I get more into knitting, it’s interesting to draw comparisons between my habits as a seamstress and my habits as a knitter. When I first started sewing, I would begin projects with a pattern I found intriguing, and then try to find the right fabric to match. As I have grown more in my sewing, I’ve learned that, more often than not, my most successful projects begin with the fabric first. I spend some time draping it over my dress form, studying its texture and weight, until it “tells” me what pattern I should use for it. As a still-beginning knitter, I usually start with the pattern, but occasionally I begin projects with a really unique yarn find.

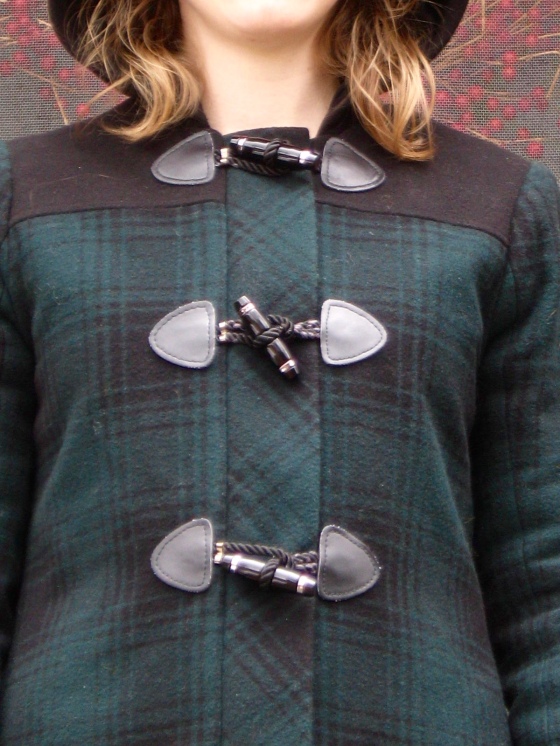
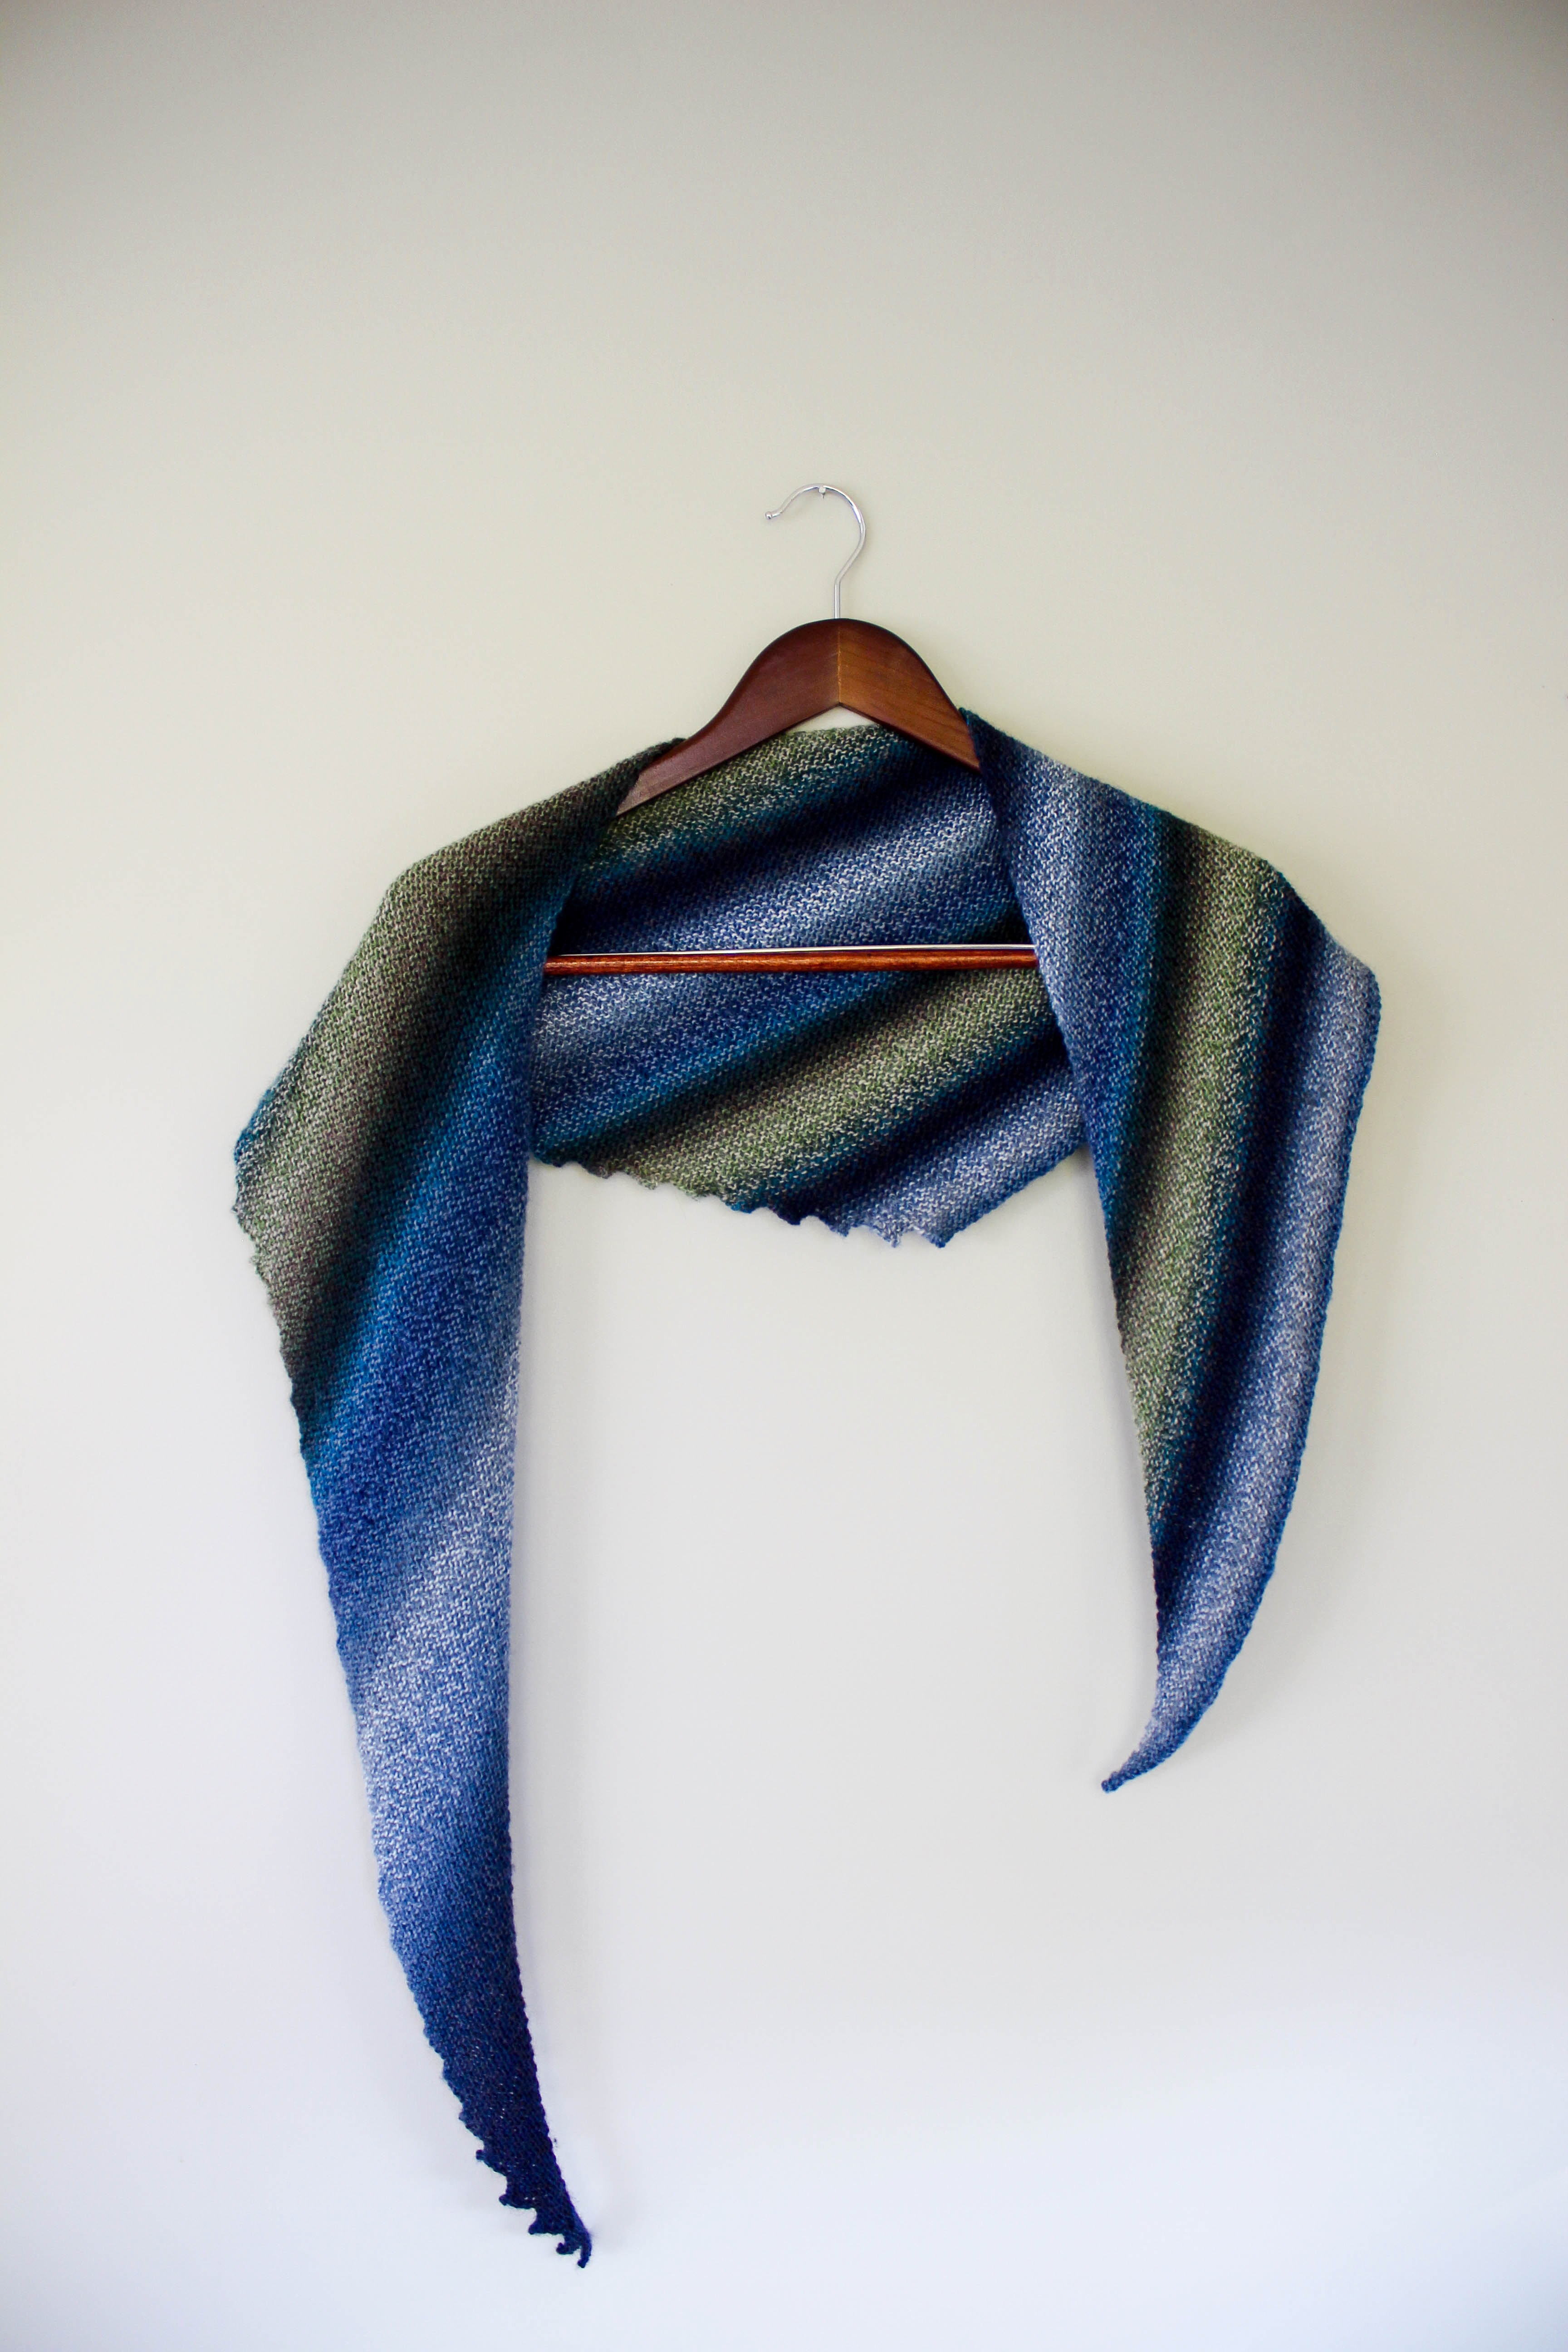
And that’s how today’s project came about. During one of my weekly visits to Twill, I noticed a gorgeous new yarn that had just been stocked – the Debbie Bliss Rialto Luxury Sock Yarn. Yes, that’s a real mouthful! The yarn, though, is a gorgeous, delicate variegated yarn with delicious color gradations and striping. I knew I wanted a simple project so that I could show off the yarn’s inherent beauty, and after some hemming and hawing, I settled on the Hitchhiker shawl pattern that has been making the rounds at Twill. It’s a very simple pattern – you begin by casting on two stitches, and then just increase from there, with occasional cast-off sections to create the ridges – but it was so fun to make in this yarn. It was almost like reading a mystery novel – I was never quite sure what the next color would be, and was delighted to see the colors unfold before my eyes.


I made this at the beginning of September, which was the great “month of weddings” – my grad school roommate and my younger sister both got married within a week of each other, so I had quite a bit of traveling to do! This project was perfect for those on-the-go days since it took only one skein to knit the entire shawl, which made it very compact to shove onto purses or bags for the next train/bus/car ride. The pattern was also simple enough that I could put it down and pick it back up again quickly, which was definitely a plus!


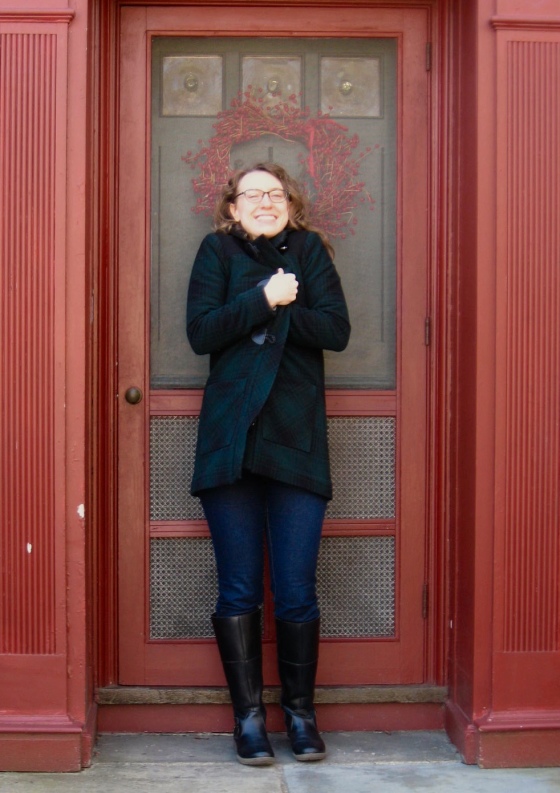
I’m so pleased with how the project turned out, but I’m still trying to figure out how best to wear it! I’m not used to this whole shawl accessory thing – do any of you have tips for how best to pair it with outfits? I’d love to hear your ideas!

Photography by Viktoryia Batsevich 

What’s Black and White and Wrapped All Over

I’m so excited to finally share a finished sewn garment for you all! It seems like a million years since I actually sewed something for *myself,* so it feels especially good to have a new make “hot off the press” to show you all. I loved the Colette Wren Dress ever since it was released over a year ago, and snapped up the pattern almost immediately. I didn’t think it would take me so long to finally make it, but better late than never!

This version is my “wearable muslin,” and although it’s certainly wearable, I definitely have some quirks to work out of the pattern next time. I’m already working on a second version, which will include detailed notes about fit/pattern alterations. For this version, I sewed it up pretty much straight out of the envelope, grading from an XS at the bust to a small at the waist (my usual for Colette patterns). I did notice that there’s a strange bit of gaping in the center front between the two front wrap points (I have a sneaking suspicion this may actually be due to a pattern error), which is difficult to see on this version due to the busy print. Rest assured, though, my second version of the Wren will go into great detail about that!


I did make one change to the pattern in this version, which was to finish the neckline using a neckband (like with a regular knit top) instead of turning under a hem. I was afraid that the front might gape open, as is often the problem with wrap dresses, but I think I overcompensated, as this dress isn’t even close to being revealing as-is. To sew the neckband on, I attached the front and back at the shoulder seams before finishing the neckband, instead of turning under and hemming each piece individually before sewing the shoulder seams. For my next version, I’m using the same neckband concept, but turning it under as a facing instead of having it show on the outside. It’s a more stable finish than just a hem, which I’m hoping will extend the life of the dress.

The fabric I used for this version is a lightweight ITY. I’m not sure of the fiber content, but I’m assuming it’s mostly polyester, maybe with a bit of nylon thrown in. It’s getting a bit cold for the dress at this point, but I’ve already worn it a ton, and come spring, I’m sure it’ll be in heavy rotation once more! I really love this design, and plan to continue tweaking it until I get the perfect dress!

Photography by Viktoryia Batsevich

Back in the Game: Pattern Testing and OAL 2016

Hello again, friends! I promise I still make things! In fact, I’ve been “making” up a storm lately – but many projects are either gift-related or pattern-testing-related, and therefore secret for the time being.

However, I can finally let one of those cats out of the bag: my lovely friend and talented knitwear designer, Mindy Abodeely of Minuetknit has just released a new pattern, which I helped test knit. The pattern, St. Armand’s Circle, is the perfect summer knitting project. I realize this probably sounds like an oxymoron (hot weather + sweaters = ???), but such unicorns do actually exist. In this case, the top blends fingering weight yarn with a diaphanous fishnet lace, creating a breezy garment that can be dressed up or down for pretty much any occasion.

IMG_3294IMG_3297

Since I’ve been a bit pressed for time this summer (read: WAY OVERBOOKED), I used this project as the knitted portion of my Outfit Along 2016 ensemble. For the sewn portion, I made myself a pair of much-needed black, high-waisted Ginger Jeans. Somewhere in the midst of getting back from my San Francisco trip and working full-time for Boston Ballet School’s summer intensive, I managed to get myself a gig as an organist, which means that I suddenly need a small army of work-appropriate pants at my disposal (playing the pedals in a skirt is a no-go for me…trust me, I’ve tried). Not wanting to wear traditional blue jeans to a Sunday morning church gig, and not having time to fit a new pants pattern, I thought black jeans might be a good solution.

I have to say, these might be my favorite pair in the history of pants – the black denim has a bit more stretch the then other blue denims I’ve used, which means they’re suuuper comfy, even though they’re high waisted. And the pocket stay means that everything stays, um, “in place,” so it’s pretty much a major win on all accounts. Since the fabric was so stretchy, I did end up interfacing the waistband with knit interfacing (which I haven’t done on any of my other Gingers), which seems to have provided the right amount of stability without making it too restrictive.

IMG_3283IMG_3289IMG_3290

A few detail shots:

IMG_3300IMG_3302

I looooove this outfit – I’m actually wearing it right now, about to go play a church service! I’m so pleased that I was able to use the OAL to create garments that actually fill a wardrobe need, and not just make more “frosting” (not that there’s anything wrong with that!). I know both of these pieces will get a lot of wear!

Me-Made-May: Travel Edition

Greetings from the West Coast, my friends!

…wait, what? With all the back and forth these days, sometimes even *I* forget which coast I live on, but this time I’m just visiting – finishing up the San Francisco Opera season with a six-week contract to help them prepare for the upcoming summer performances (which will be amazing, btw!!!). After that, I’ll be permanently on the East Coast. But for now – I’ll enjoy SF while I can!

I originally wasn’t going to participate in Me-Made-May (MMM) since I knew I’d be traveling, but then I realized that, for me, this posed the ultimate wardrobe challenge – could I travel for six weeks bringing (almost) only me-made items? Challenge accepted!

So, instead of posting all of my outfits from May so far, I will first show you what went into my suitcase:

Clockwise from the top left, we have:

  1. Intimates: two me-made bras and tens pairs of underwear (I may have gone on a last-minute underwear-sewing binge before my trip…)
  2. Activewear: two full sets of me-made activewear (blogger here and here)
  3. Dresses for work and special occasions: one Moneta, two wrap dresses, one Flora
  4. Bottoms: two skirts (Hollyburn and Mabel) and a pair of shorts
  5. Jeans: two regular pairs and my pair of jeggings (for days off!)
  6. Five tops: three Renfrews, on Lady Skater peplum top, and one Lark Tee
  7. Outer layer: my Hetty cardigan and Morris Blazer
  8. Other miscellaneous pieces: my Soma swimsuit, two pairs of Virginia Leggings in grey and black, and a nightgown (based on this pattern)

I did bring a few non-me-mades, including a North Face jacket, some ballet gear, and a ratty old pair of jeans in case I go hiking. So far, only the jacket has been used.

And now some highlights from my MMM experience thus far:

My favorite day so far, however, was yesterday, when I ran the famous Bay to Breakers race in my Sewaholic running gear!

IMG_3234.jpg

To see the rest of my MMM outfits, you can take a look at my Instagram feed (dressingtherole). Can’t believe it’s halfway over already!!

Knit Cabled Poncho: Living the Dream (plus exciting news!)

Oh man, you guys…I am SO not feeling this whole blogging thing right now :P. As is evidenced by the fact that I haven’t blogged for over two weeks. Sometimes when I really get into the “thick of it” in terms of making actual finished projects, I find that I just can’t get into the blogging mindset…do you ever experience that???

I couldn’t wait any longer with today’s project, though, since it’s one that I absolutely love – I mean, a poncho is basically a wearable blanket, right? And isn’t that just living the dream? Now that spring has decided to actually show up here in New England, it’s getting a bit on the warm side for big knitted projects like sweaters, so this is a perfect transition piece, especially when knit up in a seasonally appropriate yarn (more on that in a minute!).

This is pattern is, once again, by my wonderfully talented friend Mindy of Minuet Knit, and is part of her Irish Roots collection of Celtic-inspired knitwear (my cabled sweater from a few weeks ago is from the same collection). I’m such a sucker for cables, so the gorgeous cable down the front just had my name on it!

I did make one change to the pattern. Instead of putting the armholes slightly to the front, I put them right at the side of the garment (I’ll put up details on Ravelry soon). I did this because I have insanely hyperextended elbows, so the armholes in the pattern pinned my elbows uncomfortably close to my body. I imagine that on normal elbows this would not be such an issue :). Changing the location of the armholes fixed that problem nicely for me, though!

IMG_3132IMG_3134IMG_3135

The yarn – oh my goodness, the yarn! – is a gorgeous silk/wool blend from a local New Hampshire yarn company called The Woolen Rabbit, which the fabulous owner of Twill had picked up at a recent yarn convention. Now, I have a confession to make – I used to try to get the cheapest yarn possible to make sure that my knit projects weren’t too pricey. And while this was fine when I was first learning, I’ve finally discovered the true joy of knitting with quality fibers. This yarn was not cheap, but it was worth every penny. It made the process of knitting infinitely more enjoyable, *and* I’ve made a garment that I love – and you really can’t beat that. So, my friends, the good stuff is worth it. Trust me.

IMG_3122

…which leads me to some exciting news: I now work at Twill as one of their sewing teachers! I’m currently teaching beginning sewing classes, for both adults and kids. I’ve already had a few students, and it’s been exhilarating! As we build up a bigger sewing base, I’m hoping to get a few garment classes off the ground as well. Being part of a local knitting/sewing community has been so nice, and has really helped me transition from crazy city life to the calmer suburbs. The Twill family has really taken me in, and I’m so thankful!

IMG_3133

Pacific Jeggings

I’m not quite sure how to break this to you guys, so I’m just gonna come right out and say it: I made jeggings. Deep breaths. Those of you firmly planted in the “leggings are not pants” camp are probably yelling at your computers now, but before you delete me from your blog readers in utter disgust, let me assure you that these are lounge pants. As in, I-only-wear-these-out-of-the-house-to-buy-groceries pants. And only-to-be-worn-with-extra-long-tops pants. I promise. Can you forgive me??

As much as these pants might be a giant faux pas, however, I do really like them. In fact, they’re probably the most comfortable pants I own – their only real competition are my yoga pants, which have taken second place in my lounge clothes drawer since these guys came along. The pattern is, once again, the Sewaholic Pacific Leggings. This time I made view A and added some width at the bottom of the legs so that they aren’t skin tight at the ankle. I added 5/8″ at each side seam at the hem, creating a total of 2 1/2 additional inches at the bottom circumference, and tapering to nothing by the knee. I’m definitely happy with this modification for a casual fit – from a distance, they look almost like real jeans, which is what I was hoping for.

The fabric is some wonderfully enigmatic substance purchased at Britex a while back. At first I thought it was a knit that was made to look like denim, but then after I cut it, I noticed that the edges were fraying a bit like woven fabric, so now I’m stumped! My current best guess is that it’s a woven (twill weave) fabric with an extreme amount of spandex, since it stretches like a knit. It’s a bit on the light side for a bottom weight fabric – I wish it were just a tad heavier – but since I’ve limited these to mostly around-the-house use, I think it will be fine.

I also added a triple stitch topstitching detail on either side of each seam. I saw a detail like this on some leggings that one of the ballet teachers I work with was wearing, and immediately knew I wanted to steal it. In fact, those leggings were my inspiration for this garment! That and the fact that I found myself in those yoga pants more often than I’d like to admit…

IMG_3068IMG_3077

And some details of the topstitching:

IMG_3083IMG_3078

I apologize for the awkward bum shot – it was the best pic I could find for the back topstitching!

These pants have gotten worn almost everyday since I made them (always before or after work, of course!), and I’m thinking I may need to make a second pair just to be sure I don’t wear them out too quickly!

So, I’m sorry if I made your eyes bleed with this post, but sometimes comfort wins over socially appropriate clothing…

IMG_3073

Springing to Action: Sewaholic Workout Wardrobe

Happy Easter Monday! Whether you observed the holiday through religious services or massive chocolate consumption (or both, in my case…), I hope everyone had a wonderful weekend. Now that I write that, I realize just how ironic it is that my post-holiday blogging is about workout clothes…is the universe trying to tell me something? 😛

Anyhow, as soon as I saw the latest Sewaholic pattern release, the Vancouver Collection, I knew I needed to add the Pacific Leggings and Dunbar Top to my activewear wardrobe. They looked like the perfect combo of sleek and practical, with their flattering design lines and fun construction details. I especially loved that the leggings had a zippered pocket option on the back waistband – such a nice extra!

I actually had traced and cut out all the pattern pieces while we were still living in San Francisco, but our sudden cross-country move prevented me from finally sewing them until a week or two ago. I began by basting the pieces together, since these patterns were new to me, to check fit before feeding them through my serger. I’m glad I did – I ended up needing to add a bit of length to the back crotch and front right where it meets the waistband. Since the leggings include generous 5/8″ seam allowances, this was no problem, thankfully. The top fit me fine as-is – my only change there was to shorten the hem by an inch or so. Some folks have noted that the sports bra version is quite short, though, so if you’re making view B, you may want to do a full-out muslin.

I also made the design decision (waaaay back in San Francisco…) to combine the color-blocking in view B of the leggings with the cropped length of view C. To do this, I simply traced out all the view B pieces and lay them on top of the tissue pattern pieces of view C, marking the shorted hemline on my traced pieces. I tend to overheat pretty quickly in full-length workout pants, so I knew the cropped version was a must, but I didn’t want to miss out on the fun color-blocking opportunities of view B! Sometimes, you can have it all :).

IMG_3090IMG_3093IMG_3092

Oh, and I took a million pictures…just to warn you ;). A few detail shots:

IMG_3099IMG_3098

You can sort of see the binding topstitching in these pics – I’m not 100% thrilled with the method the pattern uses for binding the neckline and armholes on the top, since it seemed unnecessarily fiddly. I feel like there must be a better way, so next time I make the top, I may try playing around with some different options. I decided to call it “good enough for now,” and hopefully will improve on future projects!

The fabric I used was designed specifically for athletic-wear. The grey was leftover from this project, and the pink is a remnant from a RTW activewear line (I think it was New Balance, but I can’t remember…) that I got from Steve’s in King of Prussia. I did use some sports-weight mesh for the straps on the top, which I got from Imagine Gnats online. I have a feeling it’s intended more for athletic shorts, though, since it’s not quite as stretchy as this pattern probably needed, but it worked out well enough for now.

In terms of daily use, these pieces have held up great so far. I’ve gone running, lifted weights, and done some pretty intense cardio (think burpees and jump squats) in these garments, and everything has stayed in place quite nicely. The top gives me just as much support as my RTW workout top, which I’m really pleased with. These new pieces have definitely put a little extra spring in my step!

IMG_3095

Irish Flair

Happy St. Patrick’s Day, y’all! I have to admit, I probably wouldn’t have realized that today is St. Patty’s until after the fact, but I *just so happen* to have this lovely, Celtic-inspired new sweater pattern to share with you, so I actually checked the date before starting this post. Research, y’know :P.

Anywho, I mentioned a few posts back that I had discovered a wonderful fabric and yarn store near where I’m living in New England called Twill, and it turns out that one of the gals who works there is not only an expert knitter, but also a fantastically talented designer! She recently released a trio of Celtic knits called Irish Roots (on a special sale through today!), and the sweater I’m showing today, Claggan Bay, is a garment I actually helped test knit for her. It was my first experience test knitting, which was pretty cool. I’ve done test sewing before, but never knitting, so I was glad to be able to swing by the store to ask Mindy (the designer) questions as I made my way through the pattern.

I have a soft spot for cables, so I really enjoyed knitting this up! I’d never done “saddle increase” shaping for the top of a sweater before, so this was a new adventure. This method of increasing essentially creates a kimono sleeve as a continuation of the neck/shoulders, instead of picking up all the sleeve stitches to do a set-in sleeve. It also creates a subtle cowl effect in the front, which is a nice design detail.

IMG_3044IMG_3039IMG_3042

Perhaps my favorite design element, though, is the back shaping. To create a slight hour-glass shape, Mindy wrote in a series in decreases and increases once you reach the smallest part of your waist, which I think looks really cool:

IMG_3041

One of the big things I really appreciated about this pattern and about Mindy’s designs in general is that she makes the fit very personalized. So, instead of saying, “knit 7 inches down from the armhole to begin your back decreases,” she says, “knit until you reach the smallest part of your waist,” etc., which is rather ingenious, since we all have such different bodies. For me, the smallest part of my waist is much higher than average, so this ensured that the shaping would fall in the correct place, and not in an awkward spot on my bum.

As far as sizing is concerned, I made a small, which is the second size up. I was waffling between that and an XS, but the yarn I chose is less drapey than the yarn the sweater was designed for, so I thought that sizing up would help it drape a little better. I think I made the right call – the upper sleeve is still a bit on the tight side, so I have a feeling the smaller size would’ve turned this into a muscle sweater. Ha!

So, all in all, I’m really happy with this new addition to my knit wardrobe – part of me is almost hoping that it stays cold a little longer so I can wear it more! (don’t worry, I said almost…hopefully I didn’t just jinx anything…fingers crossed!)


IMG_3045

The Cascade Duffle Adventure, Part 2: Construction, and all that jazz

One season of House of Cards later, I think I’m finally ready to attempt to write about my coat making experience – whew! And yes, there will be a million photos.

First off, I have to admit – this was not as difficult an undertaking as I had thought it would be! In fact, the most difficult part, in my opinion, was tracing and cutting a bajillion pattern pieces. Of course, there were certainly some tricky bits in the construction process, and you need some sewing experience under your belt before attempting it, but this is definitely a great “first coat” pattern for those thinking of diving in.

Before I dive into the sewing details, I wanted to take a moment to discuss sourcing my materials. My fabric was purchased from Fabric Outlet in San Francisco during a flurry of moving-induced retail therapy. For my lining, I went with flannel-back satin, otherwise known as Kasha, which, interestingly enough, I found at Amazon (via Vogue Fabrics). I also sourced my medium-weight knit interfacing from Amazon/Vogue, and have been happy with both so far. My toggles were purchased from Pacific Trimming via Etsy. I’m a bit concerned about their durability – they’re already starting to show some wear, so I may end up needing to replace them down the line. Fingers crossed! Now to the fun part…

After basting the pieces together, as discussed in my last post, I took all the pieces apart and began sewing the coat “for real.” I followed Jen’s excellent Cascade Sew-Along in addition to consulting the instruction booklet, which helped ensure that I didn’t miss any steps. There were a few construction points that were covered more thoroughly in the instructions, while others were dealt with more in the sewalong posts, so if this is your first coat rodeo, I would recommend referencing both.

I did add a few extra steps by hand just to make life harder to help ensure the coat’s longevity. First of all, I catch-stitched the coat and sleeve seam allowances to the coat body, since I didn’t want “runaway seam allowances” sandwiched inside my coat lining. My hope is that by securing the SAs down, it will avoid unnecessary rubbing inside the coat, and perhaps prevent the fabric from breaking down due to friction.

I also sewed the toggles on by hand. I was too scared to put those suckers under my machine, especially since I didn’t have any extras to play with, so I went the safer, if more time consuming route. To do this, I first poked holes around each toggle with a needle to make sure that my spacing was even as I sewed around them. I then used topstitching thread with a backstitch to secure them to the coat. So far, they seem to be staying put just fine!

The last “extra bit” I did by hand was to catch-stitch the hem facing to the coat body after bagging the lining but before sewing the sleeve opening shut. I did this after several weeks of wearing the coat around (true story: I wore this coat for three weeks before I actually finished it :P), when I discovered my hem facing “drooping” down past the actual hem placement. I believe this was because my lining was extra thick/heavy, which may have been weighing the hem down more than usual. A bit of hand sewing quickly fixed the problem. Yes, it took a little longer, bit I think it was worth it in the end!

And now the bit you’ve all been waiting for: PHOTOS! Feast your eyes:

IMG_2980IMG_2983IMG_2984

Here we get to play “find the lower back seam” – I’m rather proud of that plaid matching!

IMG_2985

And I am REALLY loving that hood – so warm!

IMG_2987IMG_2962

Toggle detail – gotta show off that hand sewing!

I still can’t believe that I actually made a freakin’ winter coat, but there’s the proof! I’ve worn it SO many times. Believe it or not, I actually didn’t have a winter coat before I made this one. My last one died sometime before I got married, and I never replaced it, so my Boston winter two years ago was NOT FUN. Thank goodness I got this one done in time!

IMG_2988

LOVE